
Webflow's Complete Guide to Link Setting | Thorough Explanation of Types and Procedures

Link settings are essential in order to guide users visiting a website so they don't wonder “what to do next.” Leads to internal pages, references to external sites, and jumps to specific sections within a page — if these are set up properly, users can get to the information they need without stress. Conversely, if the link doesn't work or the destination is difficult to understand, visitors will leave.
In this article, I will explain how to add and set up links in Webflow, with specific steps for each type. Even if you are using Webflow for the first time, you can set it up if you follow the steps, so be sure to watch until the end.
[Image] Screenshot Screenshot of opening the Add Elements panel on the Webflow designer screen and displaying Link Block and Text Link
Why link setting is important for websites
Links are a factor that greatly affects the quality of a website, both in terms of user experience and SEO. From the user's point of view, if related information is linked to each other, the desired information can be immediately accessed, leading to an increase in stay time and satisfaction. Especially on service sites and media sites with large amounts of information, internal link design is directly linked to user migration rates. Note that visual feedback when hovering over a link is also important.Hover animation implementationIt can further attract users' attention.
Link settings also have a big meaning from a search engine's point of view. Internal links communicate site structure to search engines and play a role in showing relationships between content. Sites with well-designed internal links increase index accuracy because search engines can crawl pages without omission. Also, links to highly reliable external sites have the effect of complementing the authority of the site.
Furthermore, by strategically placing internal links, it is possible to focus ratings (page rank) on important pages. By collecting many internal links to pages close to conversion, such as inquiry pages and service detail pages, it is possible to raise the SEO effect of the entire site.
Basic steps for adding links in Webflow
When setting up a link in Webflow, it is necessary to first decide “which element to attach a link to”. The components you use will change depending on whether you want to set a link to a part of the text or whether you want to combine images or multiple elements into an area where they can be linked.
Proper use of Link Block and Text Link
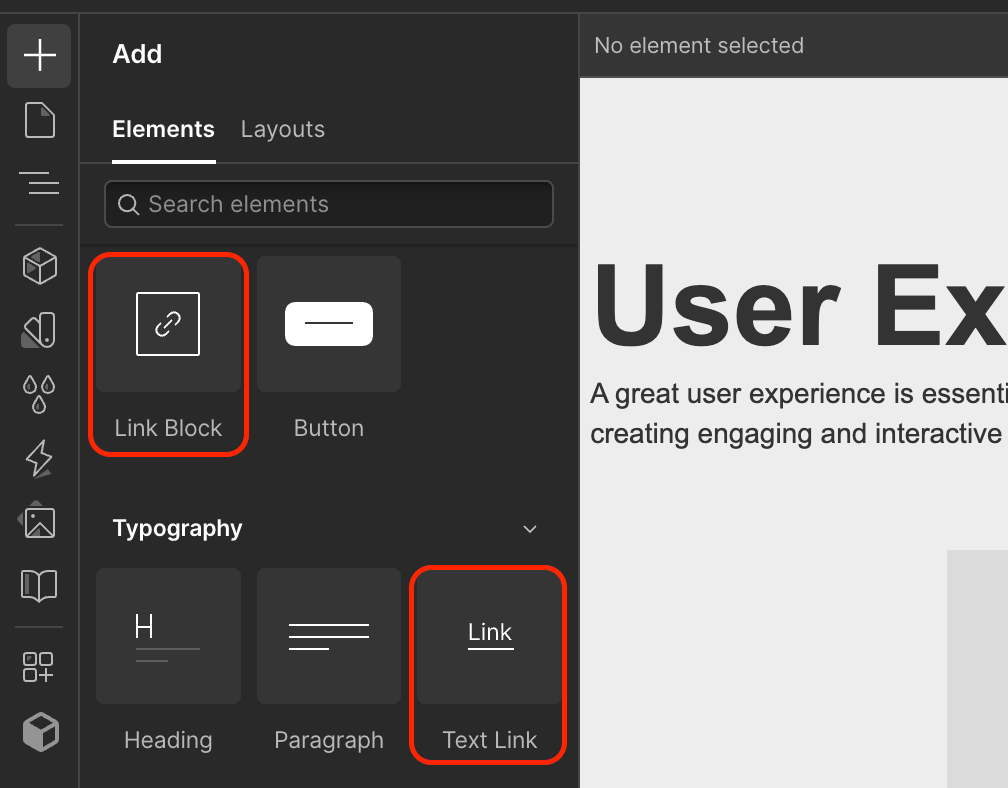
When setting up a link in Webflow, the first choice is either Link Block or Text Link. You can add each one from the Add Elements panel.
Link Blocks are used when you want an entire block to be a linkable area. For example, it's ideal when you want to make the entire card UI that combines images and text clickable, or when you want to link icons and descriptions as a set. Since the range that can be clicked is expanded, intuitive operation is created.
Text Link is used when you want to link only part of a sentence or specific text. It is suitable for placing external links to specific keywords in the text of an article or when creating text navigation in the form of buttons.
Note that it is not possible to set a direct link to a Div Block in Webflow. If you want an entire block to be linkable, be sure to use Link Blocks.
Specify the link destination in the settings panel
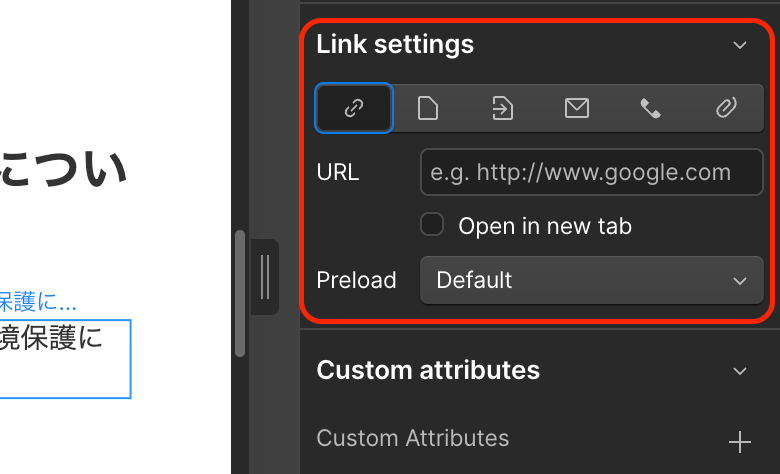
Once you've added a Link Block or Text Link to the canvas, open the Settings panel (Settings) on the right with the element selected. From the “Link Settings” tab, you can set the type of link destination and the transition method.
[Image] Screenshot of a UI where link types such as URL or page can be selected with the Link Settings tab on the screenshot settings panel open
Types of links that can be set in Webflow and how to set them
Webflow offers various configuration options depending on the type of link destination. Let's check out the features and setup procedures for each.
External URLs (links to other websites)
You can set it simply by entering the URL of an external site in the URL field of Link Settings. It is used to guide you to pages of reference materials and related services. If you want to open it in another tab, check “Open in new tab”. In order to reduce the risk of users leaving the original site unintentionally, we basically recommend displaying external links in a new tab.
Internal links (links to other pages within the site)
Select “Page” in Link Settings and specify the transition destination page from “Choose a page”. It is used to organize navigation within the site, such as from the homepage to the service detail page, and from the blog list to specific articles. If you want to link to the CMS collection page, select “Collection Page”. If there are so many pages you're looking for that it's hard to find,Link search functionBy using, you can quickly specify pages.
In-page links (anchor links)
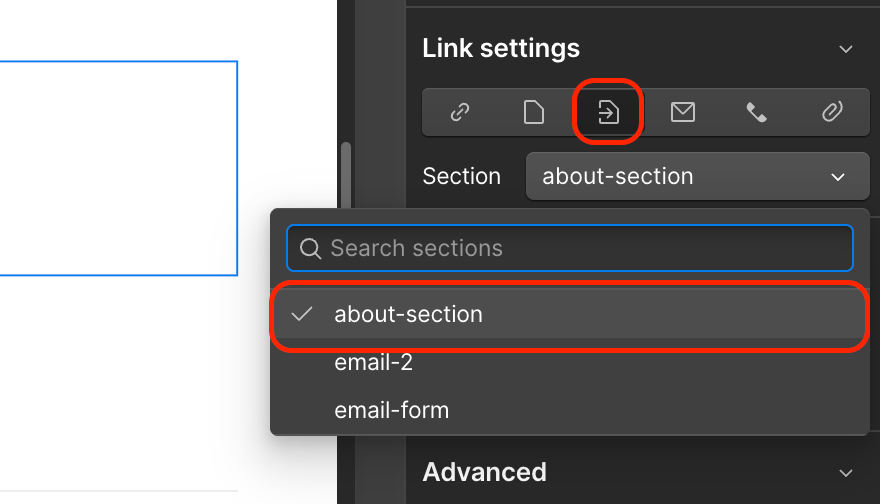
It is used when you want to jump to a specific section within the same page. It acts like a “table of contents” on FAQ pages and long explanation pages, and allows users to quickly access what they want to read. Setup is completed in 2 steps.
First, select the section or element you want to jump to, then enter an arbitrary ID in the ID field on the settings panel on the right (example:about-section) is entered. Next, select the text or button you want to set a link to, select “Page Section” in Link Settings, and specify the ID you just set. If you don't see it on the list#about -sectionDirect input is also possible, as shown below. Make sure you scroll smoothly in preview mode after setting.
[Image] Screenshot screenshot with AB-section entered in the ID field on the link settings screen within the screenshot page
Links to email addresses
Select Email in Link Settings and enter your email address. When a user clicks the link, the email application starts, and an email can be sent directly. Unlike the inquiry form, users can directly use the email application they usually use, so the operation is intuitive.
Link to phone number
Select Phone and enter your phone number. It's particularly effective when accessing with a smartphone, and you can send a message simply by tapping a link. Useful if you want immediate access to customer support or sales numbers.
link to a file
You can set up a link to a file uploaded to Webflow's Asset Manager. It is used when you want them to download PDF materials or catalogs.
Points to improve user experience by utilizing link settings
When setting up a link, it is important to be aware of “where the user wants to go next.” By connecting highly relevant pages to each other with internal links, user migration is promoted. For example, it is effective to devise links to fee pages and case studies pages on service introduction pages, and links to related articles in blog posts.
Also, it is important to use words that understand the content of the link destination in the link label (text). Rather than vague expressions such as “here” or “click here for details,” using specific text such as “see the Webflow link setting guide” has a positive effect on both users and SEO.

[Image] Screenshot Webflow Designer screen shot of the navigation menu with internal links set
summary
Webflow's link settings are an important feature for improving both user experience and SEO. By properly using Link Blocks and Text Links, and selecting link types that suit the purpose, such as external URLs, internal links, in-page links, emails, telephones, and files, you can create a site structure that is easy for visitors. What are the link settingsPre-publication checkIt's also an important check item, so be sure to check the operation of all links before publishing your site.
In-page links, in particular, are effective on pages with a lot of information. Setting up using an ID takes a bit of time and effort, but once you remember it, you can implement it without hesitation. Please review the link design of your Webflow site by referring to the steps in this article.
Booost is a web development service specializing in the no-code tool "Webflow."
We maximize your website's customer acquisition power through three optimizations: design, marketing, and translation.

